Haiice's main products currently include blood glucose meters and test strips. The company adheres to the production philosophy of putting technology first and striving for excellence to serve the public, constantly innovating product technology, and bringing the gospel of health to the vast number of users.
Home > 产品展示 > Hainice blood glucose meter
Hainice blood glucose meter
Edit date:2024-04-07 reading :987
abstract:Quick detection, only three steps required, only 0.5uL of blood is sucked
Quick detection, only three steps required, only 0.5uL of blood is sucked
.jpg)
.jpg)
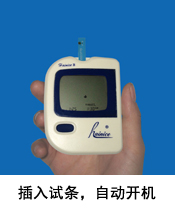
insert test strip and automatically start up Automatic inhalation of blood sampl Display results in 10 seconds
1. Blood glucose test
1-1 Preparation work for blood testing
1. First, fully insert the applicable password card into its position until the correct password value is displayed on the screen, and then remove the password card. The word "OK" will appear on the screen to indicate that the instrument is functioning properly (if "E-C" appears, it indicates that the password card is incorrect, please contact the dealer)
.jpg)
Attention:
Each box of test chips contains a dedicated password card, which is exclusively used by the box.
Do not use other test pieces from the box!
Please ensure that the password card is fully inserted into its position.
The password indicated on the password card, the number indicated on the test bottle, and the number displayed on the instrument must be consistent.
Each box of password cards only needs to be inserted once to be automatically memorized, and there is no need to insert them again before operation.
2. Then insert the test piece, and the blood glucose meter will automatically start. The screen will first display "CHK" and the test piece symbol, indicating that the instrument is undergoing self testing. Then, the ambient temperature and password value will be displayed.
Attention: After removing the test piece, quickly cover the test piece box cover!
3. Please verify if the password value matches the number shown on the label of the test bottle.
.jpg)
Note: When using another bottle of test strips with different batch numbers, you must replace the password card with a new one.
1-2 Steps for detecting blood sugar
1. Please wash your hands with warm water first and thoroughly dry them. (Warm water can stimulate blood flow at the fingertips for easy blood collection) If there is alcohol, it is better to use it to disinfect the fingers first.
2. Insert the test piece into the blood glucose tester, and the screen should display the password value "Code xxxx" of the password card (if the temperature is below 10 ℃ or above 40 ℃, "" will appear)
Attention: The number on the label of the test bottle must match the number displayed on the instrument.
3. Place the blood glucose tester flat on the table and start collecting blood (fingertips or earlobes) (If collecting fingertip blood, please level your hand for 10 to 30 seconds before collecting blood. Please use a new blood collection needle.)
4. Take out a drop of blood, place your finger close to the bloodsucking area, and the blood will automatically be introduced into the bloodsucking area and start the test.
Attention: The principle of blood is to be fully aspirated, just touch lightly. Do not apply or touch the bloodsucking area with force.
5. The screen will first display "10" and start counting down.
6. When the countdown reaches "0", the screen will automatically display your blood sugar value correctly.
7. The instrument will automatically remember the latest 180 blood glucose test results.
When the tested blood glucose value is ≥ 13.7mmol/L, the ketone body prompt "KETONE" will be displayed
9. Remove the test piece from the instrument, and the instrument will automatically shut down.
1-3 Understand your test results:
The blood glucose levels circulating in the bloodstream are constantly changing and can be influenced by many factors, such as:
1. Test at different times of the day.
2. Types of food consumed.
3. Physical vitality status.
4. Insulin and drugs.
1-4 Normal blood glucose levels:
The blood sugar reading value of the patient with well controlled diabetes should be:
1. On an empty stomach: 70~110 mg/dL (3.9~6.1 mmol/L)
2. 1-2 hours after meals: less than 160 mg/dL (less than 8.9 mmol/L)
The blood glucose reading of a normal person should be:
1. On an empty stomach: 70~110 mg/dL (3.9~6.1 mmol/L)
1 hour after meals: less than 160 mg/dL
2 hours after meals: less than 120 mg/dL
1-5 High blood glucose readings:
If the blood sugar level is too high or there are the following symptoms of high blood sugar: dry mouth, thirst, frequent urination, nausea, vomiting, blurred vision, drowsiness, or abdominal pain, please consult a professional physician.
1-6 Low blood glucose readings:
If the blood sugar level is too low or there are the following hypoglycemic symptoms: night sweats, chills, palpitations, headaches, blurred vision, dizziness, rapid heartbeat, or tinnitus, corner of mouth or finger paralysis, please consult a professional physician.
2. Review average and memory
The Hailes blood glucose tester has a memory capacity of 180 sets with date and time annotations. It also provides you with the average values of blood glucose test results for 7, 14, 21, and 28 days. You can query the average value and memory through the following simple steps.
Step 1: Enter the memory mode and press the memory button twice when the instrument is turned off. At this point, a 7-day average will appear, indicating that the instrument is in memory mode. If you continue to press the memory key, the average values for 14, 21, and 28 days will appear sequentially, and then you can query the latest 180 sets of blood glucose test records.
The 7-day average is calculated by averaging all blood glucose test records over the past 7 days. It also shows that you have taken several blood glucose tests during this period. For example: 12 (indicating that you have taken a total of 12 blood glucose tests in the past 7 days). If this is your first time using this blood glucose tester, "7 DAYa..." will appear on the screen, indicating that there is no memory data available. Calculate the average values of 14, 21, and 28 days in order.
Step 2 Review Memory
After pressing the memory button six times, the 28 day average display will replace the most recent blood glucose test memory. With each press of the memory button, the screen will display the most recent blood glucose test records for the first 180 groups. When the memory capacity is full, the oldest memory will be replaced by the latest memory.
Step 3: Leave the memory mode
Press the memory button continuously for 3 seconds, and the screen will display OFF. Release the memory button to automatically shut down.
3 Instrument settings and deletion memory
You must first enter the setup mode in order to set up the instrument. When the instrument is turned off, press the black setting button located next to the battery holder to enter the setting mode.
Step 1: Set the year
When the instrument is turned off, press the black setting button located next to the battery holder to enter the setting mode. Firstly, the year will flash, and pressing the memory button once will add one more year. Hold down the memory key to quickly set the year. After selecting the correct year, pressing the set button will cause the month to flash.
Step 2: Set Month
When the instrument is turned off, press the black setting button located next to the battery holder to enter the setting mode. Press the memory button until the correct month appears. Hold down the memory key to quickly set the month. After selecting the correct month, pressing the set button will cause the date to flash.
Step 3: Set the date
When the instrument is turned off, press the black setting button located next to the battery holder to enter the setting mode. Press the memory button until the correct date appears. Hold down the memory key to quickly set the date. After selecting the correct date, pressing the set button will cause the hour to flash.
Step 4: Set the hour
When the instrument is turned off, press the black setting button located next to the battery holder to enter the setting mode. Press the memory button until the correct hour appears. Press and hold the memory button to quickly set the hour. After selecting the correct hour, pressing the set button will cause the minute to flash.
Step 5: Set the minute
When the instrument is turned off, press the black setting button located next to the battery holder to enter the setting mode. Press the memory button until a positive solution appears for a minute. Press and hold the memory button to quickly set the minute. After selecting the correct minute, pressing the set button will cause the unit to flash.
Note: When the date and time are changed, the average value may also change.
Step 6: Select the unit of blood glucose value
When the instrument is turned off, press the black setting button located next to the battery holder to enter the setting mode. Press the memory button until the desired unit appears. After selecting the unit, pressing the set button will cause the temperature unit to flash.
Step 7: Select ℃ or ℉
When the instrument is turned off, press the black setting button located next to the battery holder to enter the setting mode. After selecting the temperature unit, pressing the set button will display "Adobe Systems" and a flashing Adobe Systems symbol. Press the memory button until the desired temperature unit appears.
Step 8: Leave the setting mode
Press the memory button until the desired temperature unit appears, and the instrument will automatically shut down. When the instrument is in the set mode, if it is turned off for three minutes, it will automatically shut down.
Note: You must go through the settings of year, month, day, hour, minute, blood glucose unit, and temperature unit in order to shut down the machine and leave the setting mode.
4 Instrument maintenance and calibration
4-1 Maintenance of blood glucose meter:
The maintenance of the Hailing blood glucose meter is very easy, as long as the following instructions are followed to ensure the normal use of the blood glucose meter:
1. Do not disassemble the blood glucose meter without permission. If there are any problems, please contact your local dealer.
2. Please be careful when carrying the blood glucose meter to avoid impact, dropping, and throwing, in order to prevent damage to the electronic components inside.
3. The operating environment of the blood glucose meter is suitable for temperatures ranging from 10 ℃ to 40 ℃.
4. Please avoid placing the blood glucose meter in excessively high or low temperature areas and their vicinity.
5. Do not place the blood glucose meter and test strips in excessively damp areas, such as bathrooms and kitchens.
6. Do not clean the blood glucose meter with water. If you want to wipe, please use a non lint cloth and do not use cleaning solution or alcohol.
4-2 Battery Replacement
A 3V button type lithium battery can be used for approximately 1000 blood glucose tests.
When the flashing "Adobe Systems" symbol is displayed on the LCD screen, please replace the battery with a new one immediately.
2. Replace with a new battery:
(1) Open the battery cover on the back of the blood glucose meter.
(2) Remove the old battery and replace it with a new one.
(3) Replace the battery cover.
Note: After replacing the battery, the original memory value will still be retained, but the time and date need to be reset.
4-3 Instrument testing
1. Insert the password detection card into the test chip socket like a test chip.
2. After removing the password detection card, "OK" appears on the screen to indicate that the instrument is in good condition.
5 Key Tips
1. Please carefully read this operating manual and other manuals before use.
2. Do not make any medical changes without following the doctor's instructions.
3. If the measured blood sugar value deviates too much from your usual measurement, please contact your doctor immediately.
4. Please avoid or reduce prolonged contact with air for unused test pieces.
5. The test piece and test solution should be used within the validity period and placed at room temperature.
6. Blood tests may contain high concentrations of reducing substances. (such as vitamin C, uric acid, etc.) can affect blood glucose measurements.
7. If the volume of blood cells in a blood test is greater than 60%, it will lead to a lower blood glucose measurement. For example, newborn blood is not recommended for blood glucose testing.
8. The test piece must be placed at room temperature and does not require refrigeration.
It is important to fill the bloodsucking area with a drop of blood. Too little or application on the test piece can lead to incorrect test values.
6 Signal interpretation and troubleshooting
Any normal or abnormal messages will be displayed as images on the LCD screen. If you still have any questions, please contact your local dealer.
1. The test piece itself can automatically start the blood glucose tester without the need to press another switch. When the test piece is pulled out, it automatically shuts down.
2. The password card only needs to be inserted before use or when replacing the battery, and does not need to be set repeatedly.
7 Signal Explanation and Troubleshooting
|
Screen display |
Signal interpretation |
Solution |
|
E-C |
Password card damaged |
If it happens again and again, please replace the password card with a new one |
|
E-E |
Indicates an error in the blood glucose tester |
Please review the operating manual and retest |
|
E-b |
Indicates that the battery is running low
|
Please replace the battery with a new one and restart after 5 seconds |
|
E-t |
Indicates that the operating temperature is too low |
Please move the instrument to an area between 10 ℃ and 40 ℃ before proceeding with the operation |
|
E-t |
Indicates that the operating temperature is too high |
Please move the instrument to an area between 10 ℃ and 40 ℃ before proceeding with the operation |
|
E-U |
Indicating used test pieces |
Do not insert used test pieces for reuse |
|
E-O |
Indicates an error in the blood glucose tester or password card |
Please use a new password card. If this happens again, please contact your local dealer |
|
E-g |
Indicates moving or removing the test piece after blood dripping |
Please review the operating manual and retest |
|
E-A |
Indicates an error in the blood glucose tester |
If it happens again, please contact your local distributor |